Wednesday, July 30, 2014

Out of the Comfort Zone! Massive Winged Liner & Bright Pink Lips!

Today I wanted to play around with this white/lavender smokey eye then play around with some bold lips. Massive liner seemed pretty appropriate too. These massive wings and bright pink lips are a bit out of my personal comfort zone but I really loved the result and look forward to rocking this look more often! You can play down the wing for a more wearable look as well. Enjoy and let me know if you recreate this using the hashtag #natslife  Thanks and have a great day, Gorgeous!

Foundation & Primers:
Mary Kay Foundation Primer and Mary Kay Eye Primer
Garnier BB Cream in Light-Medium
Maybelline Fit Me  Concealor in Sand 20
Setting Powder: Revlon Photoready Pressed Powder in Translucent 

Eyes
Base: Maybelline Color Tattoo in Too Cool (stark white with a slight shimmer)                   
Lavender Fog by MK
Outer V: Start with the Outer V using the NYX Jumbo Eye Pencil in Black Bean (Matte Black). You could also use any Black Eyeliner. Create the V with the Pencil then use a fluffy brush to smudge & blend
Crease: Mary Kay Mineral Eyeshadow in Lavender Fog (this is a Matte Purple/Gray color. I'll insert a picture. It's quite unique and I love it.)
Lid: Inner Corner to the blending point of the Black Bean Pencil, Jordana 12 Hour Made to Last Jumbo Pencil in Eternal White (Matte White), then on top of that add MK Mineral Eyeshadow in Crystalline (Shimmer White)
Highlight Under Brow & Inner Corner: MK Crystalline
Bottom Lid: Outer Third-NYX Black Bean-bring this all the PAST where the inner eye ends, almost to the inner corner BUT more straight across than up into the corner. The reason for this is we want elongate the eye on the bottom since we have such a strong wing on the top as well as a blacked out waterline. Otherwise our eyes could look way smaller than they are. 
Go over the bottom lash line with Jordana 12 Hour Made to Last Eyeliner Pencil in Purple Fix then blend. 
This will make the purple from the top cohesive with the bottom lid. 
 
Eyeliners
Upper Lid: Maybelline Eye Studio Gel Eyeliner in Blackest Black
Upper & Lower Waterline: Rimmel Scandaleyes Eyeliner in Black
My bottom lids are tattooed Black. See "Bottom Lid" explaination above for additional liners. 
Mascara: #1 Mary Kay Lash Love Mascara in I love Black #2 Jordana Best Lash Extreme Volumizing Mascara in Black #3 Mary Kay Ultimate Mascara in Black
This is a PERFECT look for False Lashes; however, I didn't use any because the only glue I had the house burns my eyes. I went for the "brush on as much and as many mascaras as you can" look. 

Cheeks
Bronzer: Mary Kay Bronzing Powder in Light-Medium. I did a sharper Contour and I also made sure to contour my nose well.
Blush: Cover Girl Cheekers in Plum Push
Highlight: Mary Lou Manizer by the Balm

Lips
Liner: NYX Lip Liner Pencil in 816 Fuchsia 
Lipstick: Maybelline Vivids 900 Hot Plum

Lipgloss: Mary Kay NouiShine Lipgloss in Pink Sateen

Saturday, July 26, 2014

Cobalt Blue with Winged Liner


Foundation & Primers:

Mary Kay Foundation Primer & Mary Kay Eyeshadow Primer
Garnier BB Cream Skin Renewal Miracle Skin Perfector for Combo/Oily Skin in Light-Medium
Maybelline Fit Me Concealer in 20 Sand
Eyes
Base: Mary Kay Cream Eyeshadow in Beach Blonde                   
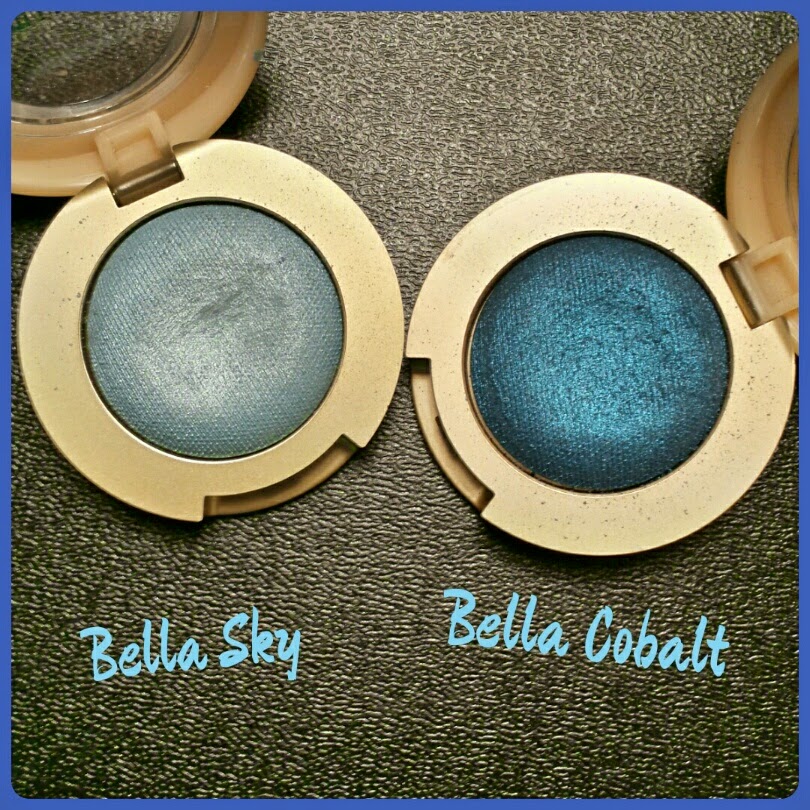
Lid: Outer corner to middle of lid-Bella Cobalt (had to really build this up though), inner third of lid-Bella Sky. Center of Lid (on top of Bella Cobalt)-just a touch of Mary Kay's Blue Metal
Crease: 1st layer-Espresso by MK 2nd layer-Driftwood by MK
Outer V: Mary Kay Mineral Eyeshadow in Iris. 
Highlight Under Brow & Inner Corner: Honey Spice
Bottom Lid: Driftwood, Bella Cobalt, Iris 

Eyeliners
Upper lid & Upper Waterline: Maybelline Eye Studio Gel Eyeliner in Blackest Black
Lower Waterline: Jordana 12 Hour Made to Last Eye liner Pencil in Purple Fix
My bottom lids are tattooed Black.
Mascara: Mary Kay Ultimate Mascara in Black

I used cream products for contour and blush. 

Cheeks
Bronzer: Cover Girl truBLEND Fixtick concealer in Deep
Blush: Mary Kay Cream Blush in Sheer Bliss
Highlight: None

I wanted some sort of muted Pink Lip but I didn't have a specific color that would work so I mixed a few different colors.


Lips
Liner: None
Lipstick: #1 NYX Butter Lipstick in Lollies
Lipgloss: Mary Kay Nourishine Plus Lipgloss in Pink Sateen
Lipstick: #2 (I put this on top of Lipgloss too) e.l.f. Moisturizing Lipstick in Rosy-Go-Round
(e.l.f. has some great products but I don't recommend this one. It does not go on smoothly and can be splotchy.)

Friday, July 25, 2014

Mandarin Orange with a Pop of Color


I was so tempted to title this look "Orange You Glad I'm Teal Here." I refrained...sort of :-)

Foundation & Primers:
Mary Kay Foundation Primer and Mary Kay Eye Primer
Mary Kay TimeWise Matte-Wear Liquid Foundation in Beige 2
Rimmel Wake Me Up Concealer in Very Fair/Light
Mary Kay Liquid Illuminater in Shade 1 (discontinued, but there are lots of dupes on the market)

Eyes
Base: Mary Kay Cream Eyeshadow in Apricot Twist (lid only)
Lid: Bella Mandarin by Milani (I LOVE this color!!)           
Crease: First I started with Golden Vanilla. Then I layered a few colors. This is the order and they are all my Mary Kay. I did the crease WITH the outer V. The order they went on decided how far into the crease (from outer corner to inner corner) they went. Driftwood, Cinnabar (up to mid way the crease), Espresso (out third of crease). Remember these all made the outer V so the went on the outer third of the bottom lid. I then added a bit more of the Mandarin on my lid in case I'd lost any while blending the crease colors. 
Inner Corners: Just a touch of MK's Honey Spice and then Bella Teal
Lower Lid: Bella Teal by Milani
Transition color from crease colors to Brow Highlight: MK's White Lilly
Highlight Under Brow: Honey Spice


Left to Right: Golden Vanilla, Driftwood, Cinnabar, Espresso

Eyeliners
Upper lid: Jordana Fabuliner Liquid Eyeliner Pen in Black 
This is PERFECT for liquid eyeliner beginners. It also makes a cat eye "flick" easy peasy!!
Upper Waterline: Rimmel Scandaleyes Waterproof Kohl Kajal in Black 100
Lower Waterline: Jordana 12 Hr Made to Last Liquid Eyeliner Pencil in 05 Aqua Stone
My bottom lids are tattooed Black. I also used some of the Aqua Stone OVER my tattoos because it is a bit more opaque than using just a shadow. I put the Bella Teals shadow on top it. 
Mascara: Mary Kay Ultimate Mascara in Black

Cheeks
Bronzer: Mary Kay Bronzing Powder in Light-Medium (If you haven't figured this out by now, this is my favorite bronzer.)
Blush: #1 The first Blush I used is an orange color by Ulta. I couldn't find the color name online, but I'll put a picture of it in here so you can compare. #2 For a little shimmer effect-Milani Baked Blush in Luminosa.
I LOVED this color combo and I'm looking for more excuses to put them together. I will continue looking for the name of the orange Ulta blush and some dupes. One close one is Mary Kay's Citrus Bloom.
Highlight: #1 Mary Kay liquid Facial Highlighting Pen in Shade 2 
               #2 Mary Lou Manizer by the Balm

Lips
Liner: On the cupid's bow ONLY-Rimmel East End Snob (I didn't have a coral liner at the time so I just used a neutral.
Lipstick: Mary Kay Creme Lipstick in Icy Peach
Lipgloss: Mary Kay NouriShine Lipgloss in Au Natural (btw, these and the NYX Butter Lipglosses are my favorite lipglosses.


These Brushes by bh Cosmetics have
been a life saver this week!
They are from the Pink A Dot Brush Set
and I love them!!
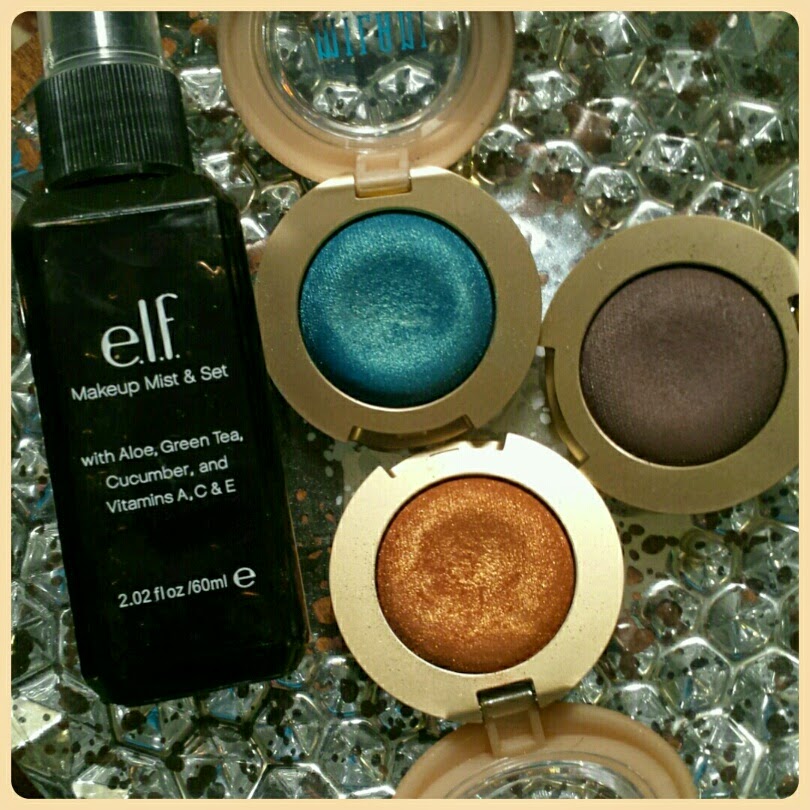
This is the Makeup Spray I use to
intensify my eyeshadows.
It is very affordable and works
like a charm. I highly recommend it!!

Wednesday, July 23, 2014

Strawberry Brownie

Foundation & Primers:
This has been my little power
trio this week!
Mary Kay Foundation Primer and Mary Kay Eye Primer
Mary Kay TimeWise Matte-Wear Liquid Foundation in Beige 2
Rimmel Wake Me Up Concealer in Very Fair/Light
Mary Kay Liquid Illuminater in Shade 1 (discontinued, but there are lots of dupes on the market)

Eyes
Base: Jordana 12 Hour Made to Lash Eyeshadow Pencil in Eternal White on the inner and middle third of the lid.                    
Lid: I stared with Strawberry Bon Bon from the Too Faced Chocolate Bar Palette all over the lid as a neutral pink base to help with the transition of the various pinks we'll be using. We'll be back here soon!        
Crease: Bella Taupe by Milani
Outer V: There are 3 layers to the Outer V starting with Bella Taupe, then Semi Sweet, then Triple Fudge (the latter 2 are also from the Too Faced Chocolate Bar Palette). Take a clean fluffy brush and bring that Triple Fudge into the Crease for some more depth. Be sure not to take this all the way to the inner corner though.
Back to the Lid! The Center of the lid and a little backward blending into that outer V will be the Darker Sparkly Pink from the Eyes on the 80's Palette from bh cosmetics. I will insert a picture for you. The inner third of the lid will be Bella Rose. (Don't forget to spray your brush with a makeup setting spray first).
The Bella Rose will also go on the inner corner of the eye and around to the inner third of the lower lid as well. I did put a little Champagne Truffle on the inner corner around the tear duct area as a base before adding the Bella Rose there.
Highlight Under Brow: Champagne Truffle from the Too Faced Chocolate Bar Palette
For a Transition Shade from the Triple Fudge (crease) up to the Brow Highlight I used a very SMALL amount (I'm talking barely dipped my brush) of the Salted Caramel from the Chocolate Bar Palette
Bottom Lid:  Bella Taupe.
Remember the inner third of the bottom lid is Bella Rose.

Eyeliners
Upper Lid: Jordana Fabuliner Liquid Eyeliner in Black
Upper Waterline: Jordana 12 Hour Made to Last Eyeliner Pencil in Espresso Last (Brown)
Lower Waterline: NYX Jumbo Eye Pencil in Strawberry Milk
My bottom lids are tattooed Black
Mascara: #1 Mary Kay Lash Love in Black #2 Jordana Best Lash Extreme Voluminzing Mascara in Black

Cheeks
Blush: #1 The Peachy color from the e.l.f. St Lucia Blush/Bronzer Duo (I'll insert a picture)
#2 Mary Kay Mineral Cheek Color in Shy Blush (I could have just used this alone, but wasn't thinking.)
Bronzer: Mary Kay Mineral Bronzing Powder in Light-Medium
Highlight: Mary Lou Manizer by the Balm

Lips
Liner: None
I really didn't own the type of pink I really had in mind for this look so I mixed a Mid-tone Dark Pink Shade Lipstick with a Nude Pink shade Lipgloss. I'll give you the names but they were both limited edition so I'll put a picture in as well so you can get an idea of what I went with.
Lipstick: (Mid 
Tone Dark Pink) Mary Kay "One Woman Can"
Lipgloss: (Nude Pink) Mary Kay "Celebrate"


Monday, July 21, 2014

Gold & Teal with the NEW Milani Bella Eyes Gel Powder Eyeshadows (Mini Review too)

Hey, Guys!! Today I'm kicking off a week long series using the Milania Bella Eyes Gel Powder
Eyeshadows. I love these. I'm hearing mixed reviews from everyone and I think I know why. These shadows can swatch AMAZINGLY and look beautiful and bright in the pot but they can sheer out quite a bit on the eyes especially if you are using a dry eyeshadow brush. With this method you really would have to build them up or use your finger instead. BUT. (And I just wanted to add a BIG BUT in there!) If you use a makeup setting spray such as MAC's Fix Plus, Mary Kay Setting Spray by Skindinavia, or (my personal favorite for THIS particular purpose) e.l.f. Makeup Mist & Set on your brush before applying the shadows you will get that vibrate, beautiful color you see in the pan. I'm not sure if this is why they are referred to as "gel" powder eyeshadows-as in you have to "wet" them for them to have that gel finish-but I really like this feature and here is why I think Milani made them this way. I think they did it because with these being a very inexpensive product you can find in any drug store they will certainly get into the hands of beginners. If a beginner who is wanting to try newer, bolder colors but is still a little afraid of them gets a hold of these shadows they are going to have a nice transition into the bolder colors because of the sheerness these shadows can provide. The more you get comfortable with the colors, get out that Makeup Spray, Baby! These shadows can pack a punch. I really do love them and have a found several of them very versatile for various looks and processes. You'll see a few of these this week and even spilling into next week. So without any further ado, here is my first of this week's tutorials featuring this great product! (Remember, if you don't have the specific products I do, just use the colors you have that are similar.)


Foundation & Primers: My Current Foundation Routine
(Click the TAB above for more info.)

Eyes
Base: Mary Kay Cream Eyeshadow in Beach Blonde
                 
All Shadows below are the Milani Bella Eyes Gel Powder Eyeshadow UNLESS otherwise noted. There are 2 MK shadows.
Crease: Bella Taupe (Satin Matte Finish)
Outer V: Bella Taupe
Lid: Outer to just before the inner third starts-Bella Gold (Metallic Finish): Inner Third & slightly UPWARD-Bella Teal (Metallic Finish)
Transition shade from Bella Taupe above the crease up to Brow Highlight Shade: Mary Kay Mineral Eyeshadow in Golden Vanilla (This shade has been discontinued which is a real shame! I've included a
picture of it for you. I'm sure Makeup Geek or Mac probably have a dupe for it.)
Inner Corner: I started out by putting a little layer of Mary Lou Manizer by the Balm and then I went it pretty strong yet thin with the Bella Teal
Brow Highlight: Mary Kay Mineral Eyeshadow in Honey Spice
Bottom Lid: Inner Third-Bella Teal; the rest of the bottom lid have a layer of Bella Taupe, a thin layer of Bella Gold, and then one more layer of Bella Taupe. I used a flat smudger brush.

Eyeliners
Upper Lid: Jordana Fabuliner Liquid Eyeliner Pen in Black (I love this! It is very inexpensive & so easy to do the "flick" for a cat eye.)
Upper Waterline: Jordana 12 Hour Made to Last Eye liner in Black Point
Lower Waterline: Jordana 12 Hour Made to Last Eye liner in Aqua Stone (one of my favorites!!)
My bottom lids are tattooed Black.
Mascara: Mary Kay Ultimate Mascara in Black
Cheeks
Bronzer: Mary Kay Bronzing Powder in Light-Medium
Blush: Milani Luminoso
Highlight: Mary Luminizer by the Balm

Lips
Liner: None
Lipstick: Mary Kay True Dimensions Lipstick in Color Me Coral
Lipgloss: None


Friday, July 18, 2014

Dark Forest n Fairy Dust: featuring Ulta eyeshadows

Foundation & Primers:
Mary Kay Foundation Primer and Mary Kay Eye Primer
Mary Kay TimeWise Matte-Wear Liquid Foundation in Ivory 7
Mixed with MK Liquid Illuminater in Shade 2. My Ivory 7 is a little light on its own right now.
Mary Kay Liquid Facial Highlighting Pen in Shade 2

Eyes
Base: Avon Eyeshadow Primer in Light Beige  
All eyeshadows are by Ulta                 
Outer V: Brownie (fill in the V) then blend across the crease lightly as well.
Lid: Start on the end of the Brownie with Willow in the center toward the inner corners
Next to that apply LIGHTLY Going Green
Inner Corner and upward (in fact this will along the inner V area): Platinum
#1 Willow, #2 Going Green
#3 Platinum, #4 Elegance
#5 Bone, #6 Brownie
Transition color between the Brownie we've blended across the crease and just up to the brow highlight color: Bone
Highlight Under Brow: Elegance
Bottom Lid: Brownie, Willow, & Platinum in the same order as on the upper lid

To blend these colors across the lid, simply overlap them lightly. If you feel you've lost any intensity with any of the shadows during this process, just add more. Add color and blend is the name of the game with this look.

Eyeliners
Upper Lid: Jordana Fabuliner Liquid Eyeliner Pen in Black
Upper Waterline: Jordana 12 Hour Made to Last Eye Liner in Black Point
Lower Waterline: Jordana 12 Hour Made to Last Eye Liner in Jade Jewel
My bottom lids are tattooed Black.
Mascara: Mary Kay Ultimate Mascara in Black (this makes your lashes look nice and full n fluffy n pretty)

Cheeks
I wasn't sure how I wanted to finish up the rest of the face so I did a lovely mixture of Shimmer and Matte and was pleasantly pleased with the results!

Bronzer: Mixture of Mary Kay Mineral Bronzer in Desert Sun (Shimmer) and Sandstone (Matte)
Blush: Mixture of Mary Kay Mineral Cheek Color in Golden Copper (Shimmer) and Sparkling Cider (Matte). I then added a bit of Loreal True Match Super Blendable Blush in N3-4 Instant Flush to give it
a little coral flush.
Highlight: Mary Lou Manizer by the Balm

Lips
Liner: None
Lipstick: None

Lipgloss: Mary Kay NouriShine Lipgloss in Pink Parfait

Wednesday, July 16, 2014

Funky Teal n Lime Green: Featuring the bh cosmetics Eyes on the 80's Palette


I wanted to do something fun with the Teal color in my Eyes on the 80's Palette by bh cosmetics. 
This palette is a really great dupe for the UD Electric Palette. It has way more shadows and its much more affordable. I love mine! Since the shadows are quite bold, I did most of my eyemakeup first then followed up with my foundation routine and finishing touches on the eyes. Let me know if you recreate this look with the hashtag #natslife!!


Foundation & Primers: My Current Foundation Routine
Click the TAB above for more info.


Eyes
From the Eyes on the 80's Palette(
Base: Jordana 12 Hour Made to Last Eyeshadow Pencil in 01 Eternal White. I used this on the lid and just above the crease. Using a white base gives your shadows bolder color.                 
All shadows are from the bh cosmetics Eyes on the 80's palette unless otherwise indicated. There are 2 shadows from MK in here. 
Crease: Mary Kay Mineral Eyeshadow in Silky Caramel (This is a GREAT transition color.)
Lid: First I sprayed some of my e.l.f. Makeup Setting Spray on a large Smudger Brush. I've found that these shadows work very well with this combo of spray and smudger. I used the Teal (# 1 in the picture to the right)
Crease/Transition Shade

Large Smudger Brush
Outer V: Shimmery Green (#2)
Transition between crease and brow: Peach shade from the Palette (#4)
Inner Corner: Lime Green from the Palette (#3) BTW, LOVE this color!!
Bottom Lid: I went across from outer corner up to the inner corner with the Teal #1 (I did not take it over the lime green.) and then I spread the lime green #3 from the inner corner all the way to the outer corner over the teal. 
Highlight Under the Brow: Mary Kay Mineral Eyeshadow in Honey Spice and a "LITTLE" glistening gold directly under the brow (This is SUPER shimmery so if you have any crepiness around your upper lid area-skip that Golden shadow.)

Eyeliners
Upper lid: Maybelline Eye Studio Gel Liner in Blackest Black
Upper Waterline: NYB Eye/Eyebrow Pencil in 901 Black
Lower Waterline: Same white pencil we used as a base by Jordana
My bottom lids are tattooed Black.
Mascara: Mary Kay Ultimate Mascara in Black

Cheeks
Bronzer: Mary Kay Bronzing Powder in Light-Medium
Blush: Mary Kay Mineral Cheek Color in Bold Berry (It's a dark pink/berry color)
Highlight: Mary Lou Manizer by the Balm (shocker!!)

Since the eye makeup is so bold, I didn't want the lips to "compete" so I used my most nude lipstick-it almost looks like concealer on my lips-and then added a soft pink gloss. I really liked the combo!

Lips
Liner: Rimmel Lip Liner in East End Snob
Lipstick: e.l.f. Matte Lip Color in Natural
Lipgloss: Ulta Super Shiny Lipgloss in #14 Starlet


Get e.l.f. Cosmetics Here!!